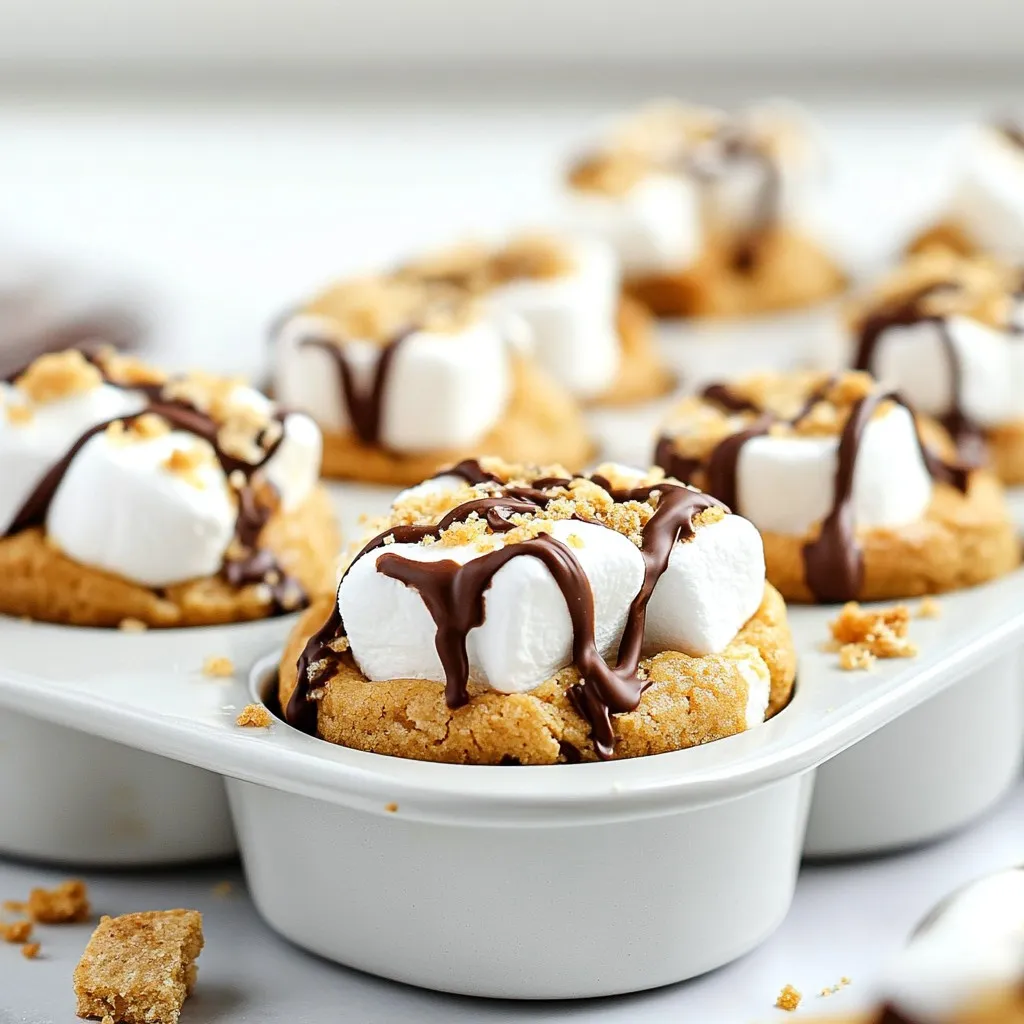
Are you ready to indulge in a sweet treat that combines the best of campfire fun and cookie joy? S’mores Cookie Cups are the answer! In this easy recipe, I’ll guide you through creating these delicious bites packed with gooey marshmallows and rich chocolate. Perfect for gatherings or a cozy night in, these cups are sure to delight everyone. Let’s dive in and make your dessert dreams come true!
Why I Love This Recipe
- Delicious Flavor Combination: The mix of graham cracker, chocolate, and marshmallow creates a nostalgic s’mores taste in every bite.
- Easy to Make: This recipe is straightforward and quick, perfect for bakers of all skill levels.
- Fun Presentation: The cookie cups are visually appealing, making them a hit for parties or gatherings.
- Customizable: Feel free to add nuts, caramel, or different types of chocolate to suit your taste preferences.
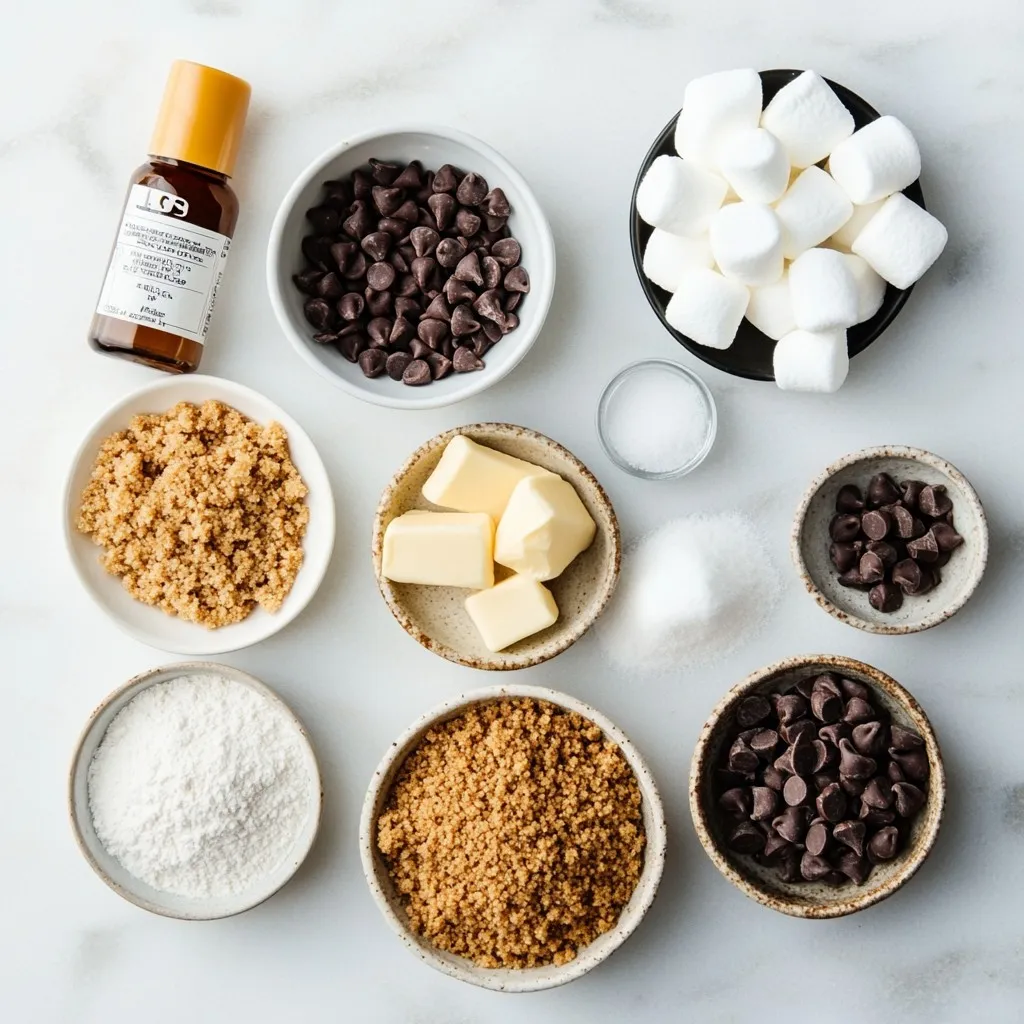
Ingredients
List of Ingredients for S’mores Cookie Cups
To make S’mores Cookie Cups, you need these key ingredients:
– 1 cup graham cracker crumbs
– ½ cup all-purpose flour
– ½ teaspoon baking soda
– ¼ teaspoon salt
– ½ cup unsalted butter, softened
– ½ cup brown sugar, packed
– ¼ cup granulated sugar
– 1 large egg
– 1 teaspoon vanilla extract
– 1 cup mini chocolate chips
– 1 cup mini marshmallows
– Optional: Additional chocolate chips for topping
Optional Ingredients for Enhanced Flavor
You can add more flavor to your cookie cups. Consider these options:
– A pinch of cinnamon for warmth
– Chopped nuts for crunch
– Peanut butter for a nutty twist
– Flavored extracts like almond or coconut
Cooking Tips for Ingredient Substitutions
Sometimes, you may need to swap ingredients. Here are some smart ideas:
– Use gluten-free flour instead of all-purpose flour.
– Replace butter with coconut oil for a dairy-free option.
– Use maple syrup instead of brown sugar for a lighter taste.
– Swap mini chocolate chips for chopped chocolate bars for more texture.
Step-by-Step Instructions
Preparation of Cookie Dough
To start, gather your ingredients. You need graham cracker crumbs, flour, baking soda, salt, butter, brown sugar, granulated sugar, an egg, vanilla, and mini chocolate chips.
1. Preheat your oven to 350°F (175°C).
2. Grease a standard muffin tin or use cupcake liners. This makes it easier to take out the cookie cups.
3. In a bowl, mix graham cracker crumbs, flour, baking soda, and salt. Stir it well and set it aside.
4. In another bowl, cream the softened butter, brown sugar, and granulated sugar together. Use a hand mixer until it is light and fluffy.
5. Next, add one egg and one teaspoon of vanilla extract. Mix until smooth.
6. Gradually add the dry mix to the wet mix. Stir until just combined. Then, fold in the mini chocolate chips.
Baking Process for Cookie Cups
Now it’s time to shape the cookie dough into cups.
1. Scoop about a tablespoon of the cookie dough into each muffin cup.
2. Press the dough into the bottom and slightly up the sides. This creates a nice cup shape for the filling.
3. Place the muffin tin in the preheated oven. Bake for 10-12 minutes until the edges turn golden brown.
How to Add Marshmallows and Chocolate
This is the fun part! Adding marshmallows and more chocolate makes your cookie cups special.
1. Once the cookie cups bake, take them out of the oven.
2. Immediately press a few mini marshmallows into the center of each cup.
3. Return the muffin tin to the oven for another 2-3 minutes. This helps the marshmallows puff up and get a little golden.
4. Let the cookie cups cool in the tin for about 5 minutes. Then, move them to a wire rack to cool completely.
5. If you want, melt a few extra chocolate chips. Drizzle them over the cooled cookie cups for a tasty finish.
Tips & Tricks
Ensuring Perfect Cookie Cups
To make perfect cookie cups, use a standard muffin tin. Grease it well or use cupcake liners. This helps with easy removal. Press the cookie dough firmly into the bottom and sides. This makes a nice cup shape for your filling. Bake until edges are golden brown. Watch closely to avoid overbaking. The marshmallows should puff up without burning.
Storage Tips for Freshness
Store your cookie cups in an airtight container. This keeps them soft and fresh. If you plan to eat them later, layer them with parchment paper. This helps prevent sticking. Keep them at room temperature for up to three days. For longer storage, place them in the fridge. They stay good for about a week when chilled.
Enhancements for Richer Flavor Profiles
For a richer taste, use dark chocolate chips instead of semi-sweet. You can also add a pinch of cinnamon to the dough. This adds warmth to the flavor. Try adding crushed nuts for a crunchy texture. A sprinkle of sea salt on top can enhance the chocolate taste. If you want something special, drizzle caramel sauce over the top after baking.
Pro Tips
- Chill the Dough: For a thicker cookie cup, chill the dough for about 30 minutes before baking. This helps prevent spreading and keeps the cups nice and tall.
- Use Fresh Ingredients: Ensure your baking soda is fresh for the best rise. Check the expiration date on the package to achieve the perfect texture.
- Customize Your Fillings: Feel free to add nuts or different types of chocolate chips for a unique twist. Peanut butter chips or butterscotch chips work great!
- Keep an Eye on the Marshmallows: Watch the marshmallows closely while baking; they can go from perfectly puffed to burnt quite quickly. Remove them as soon as they are golden.
Variations
Alternative Fillings for Cookie Cups
You can switch up the fillings in your S’mores cookie cups. Try using peanut butter chips for a nutty twist. You can also add caramel bits for a sweet surprise. If you want a fruity touch, think about using dried cherries or strawberries. Each option gives a fun spin to this classic treat.
Substituting Ingredients for Dietary Preferences
Need to adjust for special diets? No problem! Use gluten-free graham cracker crumbs for a gluten-free version. Swap the butter with coconut oil for a dairy-free option. If you want to cut sugar, use a sugar substitute that measures like sugar. These changes keep the fun while fitting your needs.
Creative Toppings and Serving Ideas
Get creative with dessert toppings! Drizzle melted chocolate on top for a rich finish. You can sprinkle crushed nuts or colorful sprinkles for extra fun. Serve with a scoop of vanilla ice cream for a special treat. A dollop of whipped cream adds a nice touch, too. Each serving becomes a new adventure!
Storage Info
Best Practices for Storing S’mores Cookie Cups
To keep your S’mores Cookie Cups fresh, store them in an airtight container. This helps to keep them soft and tasty. You can place a piece of bread in the container to keep them moist. Make sure to store them at room temperature. They stay good for up to five days this way.
How to Reheat for Optimal Enjoyment
If you want to enjoy your S’mores Cookie Cups warm, reheating is easy. Preheat your oven to 300°F (150°C). Place the cookie cups on a baking sheet. Heat them for about 5 minutes. You can also use a microwave. Heat them for about 10-15 seconds. This gives you a warm treat that feels fresh.
Freezing Instructions for Longer Storage
If you want to save some for later, freezing works great. First, let the cookie cups cool completely. Then, wrap each cup in plastic wrap. Place them in a freezer bag or airtight container. They can last for up to three months in the freezer. When you’re ready to eat them, let them thaw in the fridge overnight. Then reheat them for a warm, gooey delight.
FAQs
How can I make S’mores Cookie Cups gluten-free?
To make S’mores Cookie Cups gluten-free, swap regular flour for a gluten-free blend. Use a mix that works well for baking. Ensure the graham cracker crumbs are also gluten-free. You can find gluten-free graham crackers in stores. This mix keeps the yummy taste but makes it safe for those with gluten issues.
Can I make these cookie cups ahead of time?
Yes, you can make the cookie cups ahead. Prepare the dough and store it in the fridge for up to three days. When ready to bake, scoop the dough into the muffin tin. You can freeze the dough too. Just wrap it well and freeze for up to a month. Thaw in the fridge before baking.
What is the best way to serve S’mores Cookie Cups?
Serve S’mores Cookie Cups warm for the best taste. The marshmallows should be soft and gooey. If you want, drizzle melted chocolate on top for a fancy touch. They look great on a platter. Add some extra graham cracker crumbs for crunch. Enjoy them with friends or family for a sweet treat!
You learned how to make tasty S’mores Cookie Cups. We covered ingredients, steps, and tips. You now know how to pick flavors and store them right. Remember, you can change up fillings for fun. Feel free to experiment with toppings and dietary needs. Each cup can be your own creation. Make them, share them, and enjoy the yummy taste. Happy bakin