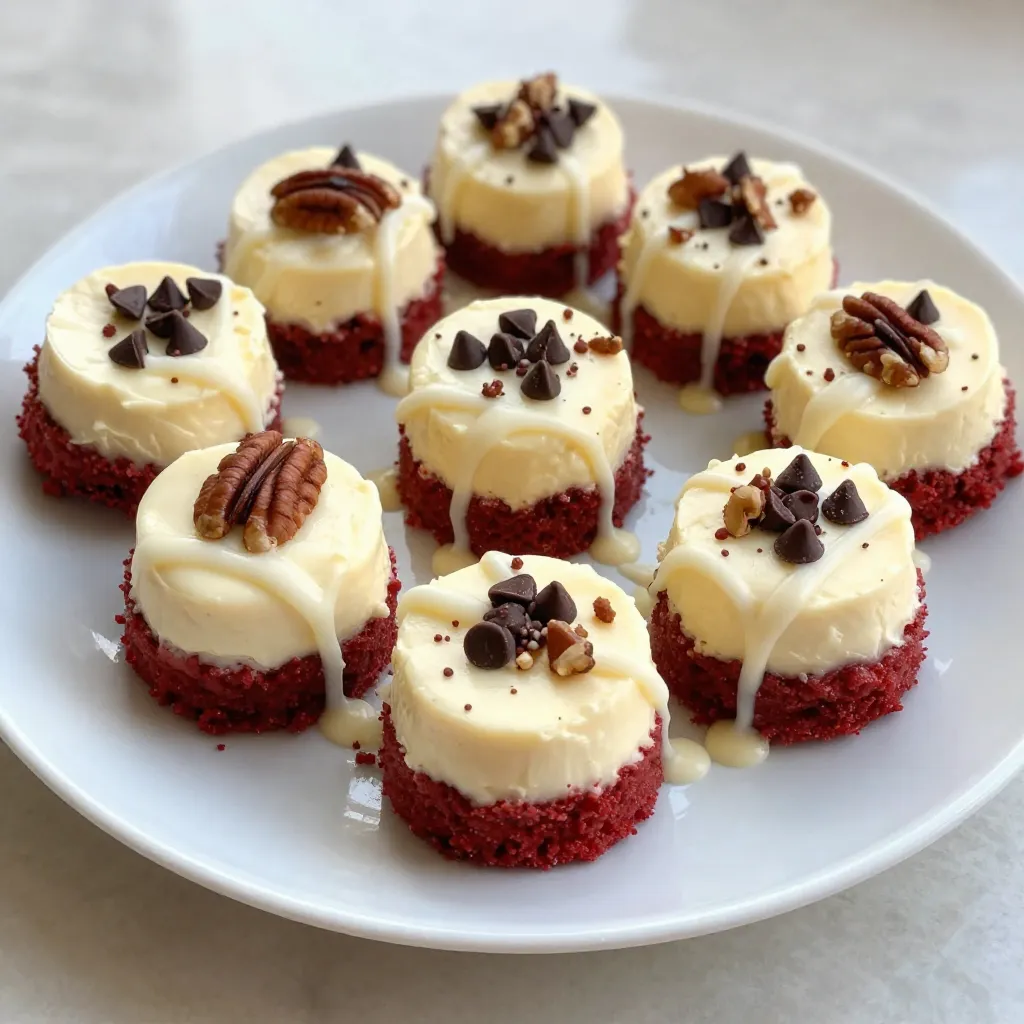
Craving a sweet treat that’s both easy and delicious? I’ve got just the thing for you—Red Velvet Cheesecake Bites! These bite-sized delights combine the rich flavor of red velvet with a creamy cheesecake filling. Perfect for parties or a tasty snack at home, they’re sure to impress. Let’s dive into the simple steps and ingredients needed to create these dreamy bites that everyone will love!
Why I Love This Recipe
- Decadent Flavor: These Red Velvet Cheesecake Bites combine the rich taste of red velvet cake with the creamy texture of cheesecake, creating a delightful treat.
- Easy to Make: With just a few simple steps, you can whip up these bites in no time, making them perfect for both beginners and experienced bakers.
- Perfect for Any Occasion: Whether it’s a party, holiday gathering, or just a sweet craving, these bites are a crowd-pleaser and suit any event.
- Customizable: You can easily add your favorite toppings, such as chocolate chips or nuts, to make these bites uniquely yours.
Ingredients
Main Ingredients
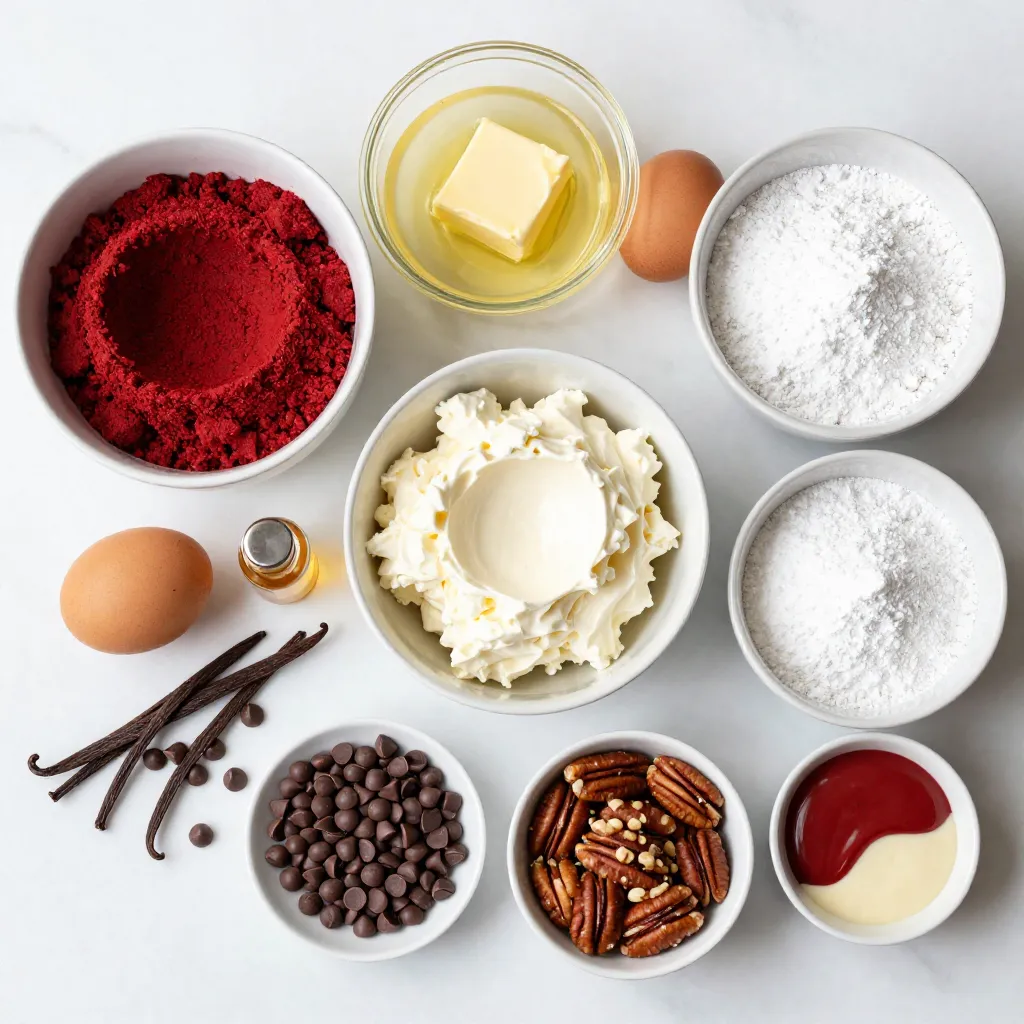
– 1 ½ cups red velvet cake mix
– 1/2 cup unsalted butter, melted
– 1 egg
– 8 oz cream cheese, softened
– 1/2 cup powdered sugar
– 1 teaspoon vanilla extract
These main ingredients form the base of your red velvet cheesecake bites. The red velvet cake mix brings the signature color and flavor. The unsalted butter adds richness, while the egg helps bind the mix. Cream cheese serves as the star of the cheesecake filling, providing a creamy, tangy taste. Powdered sugar sweetens the filling, and vanilla extract enhances the overall flavor.
Optional Ingredients
– 1/4 cup mini chocolate chips
– 1/4 cup crushed pecans or walnuts
– Red or white chocolate for drizzling
You can mix in mini chocolate chips for added sweetness and texture. Crushed nuts, like pecans or walnuts, offer a nice crunch and taste. For a beautiful finish, drizzle melted red or white chocolate over the bites. These optional ingredients make your treats even more delightful and fun.
Step-by-Step Instructions
Preheating and Preparation
– Preheat your oven to 350°F (175°C).
– Line a mini muffin pan with paper liners or spray with non-stick cooking spray.
Making the Cake Base
– In a mixing bowl, combine 1 ½ cups of red velvet cake mix, 1/2 cup melted unsalted butter, and 1 egg.
– Stir until you form a smooth batter. It should be thick and rich.
Baking and Cooling
– Scoop about a tablespoon of the red velvet batter into each mini muffin cup, filling them halfway.
– Bake in the preheated oven for 10-12 minutes. Insert a toothpick; it should come out clean.
– Let the bites cool completely before you move to the next step.
Creating the Cheesecake Filling
– In a separate bowl, beat 8 oz of softened cream cheese, 1/2 cup powdered sugar, and 1 teaspoon of vanilla extract.
– Mix until the filling is creamy and smooth. This will be the star of your bites.
Assembling the Bites
– Once the cake bases are cooled, carefully remove them from the muffin tin.
– Top each red velvet bite with a generous dollop of the cream cheese filling.
– If you like, sprinkle mini chocolate chips or crushed pecans/walnuts on top for added flavor.
Chilling
– Melt red or white chocolate in the microwave and drizzle it over the cheesecake bites.
– Place the assembled bites in the refrigerator for at least 30 minutes to set. This helps the flavors blend well.
Tips & Tricks
Perfecting the Red Velvet Flavor
To get the best red velvet flavor, use high-quality cake mix. The mix should be rich in taste and color. Also, adjust the butter for moisture. If you add a bit more butter, the bites will be soft and tasty.
Ensuring Cream Cheese Smoothness
Always allow your cream cheese to soften before mixing. This helps it blend easily. Mix it thoroughly with powdered sugar and vanilla for a creamy texture. A smooth cheesecake filling makes each bite delightful.
Presentation Tips
For a neat look, use piping bags to add the cheesecake filling. This makes it easy to control how much you put on each bite. When drizzling chocolate, do it slowly and steadily. A neat drizzle adds a lovely touch to your treats.
Pro Tips
- Use Room Temperature Ingredients: For the best texture and flavor, ensure your cream cheese is at room temperature before mixing to achieve a smooth filling.
- Don’t Overmix the Batter: Mix the cake batter just until combined to keep the bites light and fluffy. Overmixing can lead to dense cakes.
- Chill Before Serving: Allow the cheesecake bites to chill for at least 30 minutes after assembling. This helps the filling set and enhances the flavors.
- Experiment with Flavors: Feel free to add different toppings like caramel sauce or fruit preserves to customize the flavor profile of your cheesecake bites.
Variations
Flavored Cheesecake Options
You can switch up the cheesecake filling for more fun. Here are two tasty ideas:
– Chocolate Cheesecake Filling: Mix in cocoa powder with the cream cheese. This adds a rich chocolate flavor that pairs well with the red velvet.
– Vanilla Cheesecake with Almond Extract: Add almond extract to the vanilla cheesecake. It brings a lovely nutty flavor that enhances the sweet red velvet.
Cake Mix Alternatives
If you want to try something different, consider these options for your cake mix:
– Homemade Red Velvet Cake Recipe: You can make your own red velvet cake from scratch if you prefer. Use cocoa powder, buttermilk, and vinegar for that classic taste.
– Gluten-Free Red Velvet Cake Mix: Look for a gluten-free cake mix if you need a gluten-free option. Many brands offer tasty mixes that work great.
Healthier Adjustments
Making these bites healthier is easy. Here are some swaps you can try:
– Low-fat cream cheese option: Use low-fat cream cheese instead of regular. This cuts down on fat while keeping that creamy texture.
– Alternative sweeteners in the cheesecake: Swap sugar for stevia or erythritol. These options add sweetness without the calories.
By exploring these variations, you can create a unique treat that suits your tastes and needs. Enjoy experimenting!
Storage Info
Refrigeration Guidelines
To keep your red velvet cheesecake bites fresh, store them in an airtight container. This helps maintain their flavor and texture. They are best consumed within 3-5 days. After that, they may lose some of their charm.
Freezing Instructions
If you want to save some bites for later, you can freeze them unassembled. Just freeze the cake bases and the cheesecake filling separately. When you’re ready to enjoy them, thaw the cake bases at room temperature. Then, assemble with the cheesecake filling and toppings. This way, you can enjoy a fresh treat anytime!
FAQs
Can I make these bites ahead of time?
Yes, you can prepare the cake and cheesecake filling ahead. Make the red velvet base and cool it. Store it in the fridge for up to two days. You can also prepare the cheesecake filling and keep it covered. Just assemble the bites when you are ready to serve.
What can I use instead of cream cheese?
If you want a dairy-free option, use vegan cream cheese. You can also try silken tofu blended until smooth. Both options work well in the cheesecake filling. They keep the texture creamy and delicious.
How do I know when the bites are done baking?
To check if the bites are ready, use a toothpick. Insert it into the center of a bite. If it comes out clean, they are done. If it has batter on it, bake for a few more minutes.
Can I use a different flavor of cake mix?
Sure! You can use chocolate cake mix for a rich twist. Vanilla or lemon cake mix also works well. These flavors will give your bites a fun new taste.
What toppings can I add?
Get creative with toppings! Here are some ideas:
– Mini chocolate chips
– Crushed pecans or walnuts
– Sprinkles for color
– Fresh berries for a fruity touch
– A drizzle of caramel or chocolate sauce
You now have a detailed process to make delicious red velvet cheesecake bites. By using simple ingredients, follow each step to get great results. Remember to add your own twist with optional flavors and toppings. These bites are perfect for any occasion and easy to store. With some planning, you can make them ahead or even freeze them. Enjoy sharing these treats with friends and family. You’ll impress everyone with your baking skills. Now, it’s time to get started and treat yoursel