Get ready to spread holiday cheer with your own Oreo Reindeer Pops! These festive treats are fun to make and perfect for any holiday gathering. I’ll guide you through the simple steps to bring these cute, delicious snacks to life. From easy ingredients to creative decoration tips, you’ll have everything you need to impress family and friends. Let’s dive into the joy of making these merry delights!
Why I Love This Recipe
- Fun to Make: Crafting these reindeer pops is a delightful activity for kids and adults alike, making it a perfect family project during the holidays.
- Customizable: You can personalize these pops with different candies or decorations, allowing for creative expression and variations.
- Perfect for Gifting: These adorable pops make fantastic gifts during the holiday season, especially when wrapped in festive packaging.
- Deliciously Decadent: The combination of Oreo cookies, chocolate, and candy creates a rich and enjoyable treat that everyone will love.
Ingredients
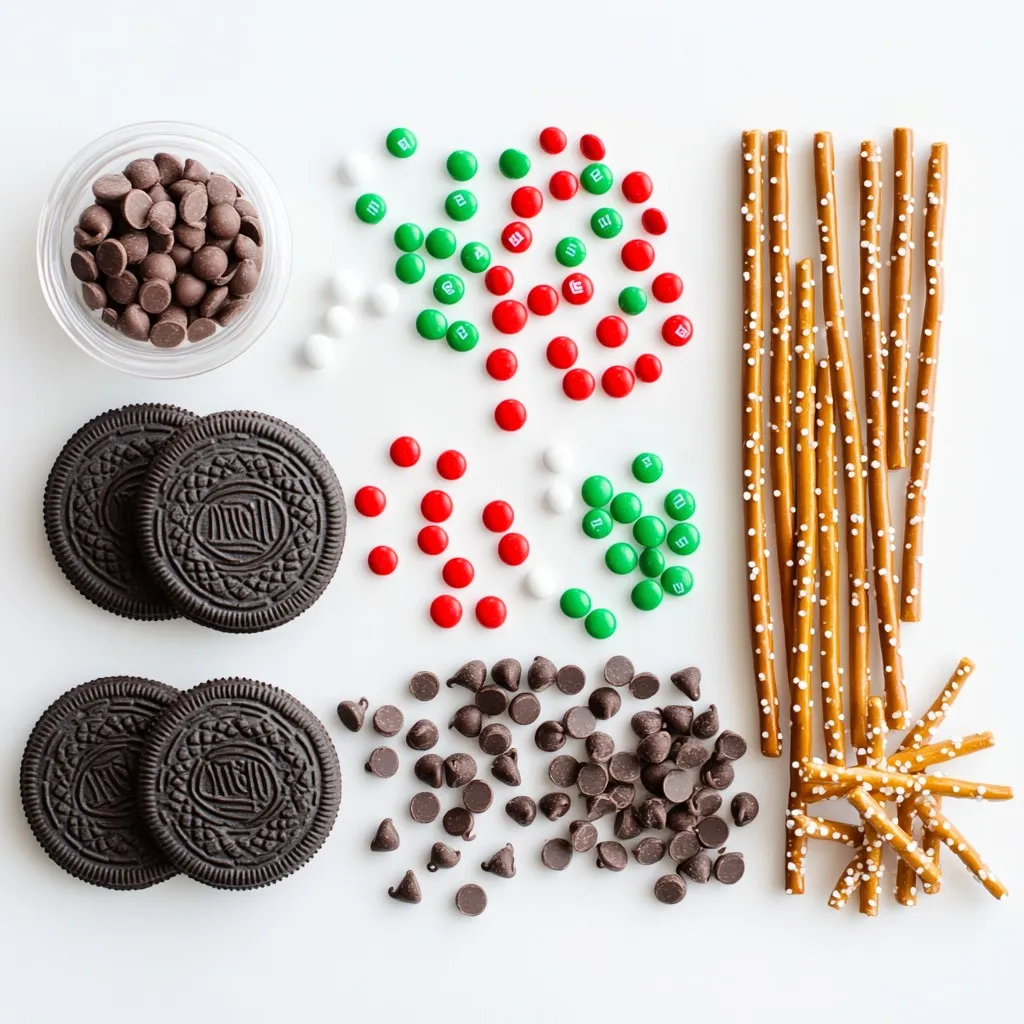
List of Ingredients for Oreo Reindeer Pops
– 1 pack of Oreo cookies
– 1 cup of semi-sweet chocolate chips
– 8 red M&M candies (for noses)
– 16 pretzel twists (for antlers)
– Lollipop sticks or wooden craft sticks
– 2 tablespoons of edible red or green glitter (optional)
Optional Ingredients for Customization
You can add fun flavors or colors to your reindeer pops. Here are some ideas:
– Use white chocolate instead of semi-sweet.
– Swap M&Ms for chocolate-covered cherries or other candies.
– Try different shaped pretzels for unique antlers.
– Use colored candy melts for a bright look.
– Add sprinkles or edible glitter for extra sparkle.
Feel free to mix and match to make these pops your own!
Step-by-Step Instructions
Preparing the Oreo Filling
To start, grab a pack of Oreo cookies. Open each Oreo by twisting it apart. Use a butter knife to scrape off the white filling. This gives you a flat base for the reindeer’s face. You can save the filling for other treats if you want.
Melting the Chocolate
Next, take a microwave-safe bowl. Add one cup of semi-sweet chocolate chips. Heat them in the microwave for 30 seconds. Stir the chips, then heat again for 30 seconds. Repeat this until the chocolate melts and is smooth. Let it cool a bit before you dip the Oreos.
Assembling the Oreo Reindeer Pops
Now it’s time to dip the Oreos. Take the flat side of each Oreo and dip it into the melted chocolate. Make sure to coat it fully. While the chocolate is still wet, add two pretzel twists for antlers at the top. Then, place a red M&M in the center for the nose.
After that, take a lollipop stick or craft stick. Push it into the bottom of each Oreo pop. If the chocolate has started to set, dip the end of the stick in chocolate first. This helps it stick better.
Tips for Setting the Pops
Once you finish assembling, lay the pops on a baking sheet lined with parchment paper. If you want, sprinkle edible glitter over the chocolate for a fun touch. Then, refrigerate the pops for about 30 minutes. This helps the chocolate to harden well.
Tips & Tricks
Best Practices for Melting Chocolate
Melting chocolate can seem tricky, but it’s easy with some care. Use a microwave-safe bowl for safety. Heat the chocolate chips in short bursts of 30 seconds. After each burst, stir the chocolate. This helps it melt evenly. If you see lumps, keep stirring. They will melt with the heat of the smooth chocolate. Let the chocolate cool a bit before dipping. This helps it stick better to the Oreos.
Decorating Ideas for Festive Touches
Make your Oreo reindeer pops look extra special! Use colored sprinkles for a fun twist. Edible glitter adds sparkle and joy. For a winter theme, use white and silver sprinkles. You can also add small candy eyes to give them character. Place a few candy canes around the pops for a holiday feel. These small details make your treats stand out at any party.
Handling the Oreo Cookies
Handling Oreos is simple but requires care. When you twist them apart, do it gently to avoid breakage. If some cookies break, don’t worry! You can use the pieces to make a fun dessert topping. For the reindeer pops, scrape the filling off to create a flat base. This helps with the chocolate coating. Keep the filling for another recipe or just to enjoy!
Pro Tips
- Chill Your Chocolate: Make sure your melted chocolate is slightly cooled before dipping the Oreos to prevent them from becoming too soft and falling apart.
- Use Fresh Pretzels: Ensure your pretzel twists are fresh and crisp, as stale pretzels may break easily when inserted as antlers.
- Experiment with Toppings: Feel free to add other edible decorations like sprinkles or candy eyes for more fun and creativity!
- Storage Tips: Store the finished reindeer pops in an airtight container in the refrigerator to keep them fresh for longer.
Variations
Alternative Toppings for Different Themes
You can change the toppings to fit your theme. For a winter wonderland, use white chocolate and sprinkle coconut flakes for snow. For a festive touch, add green sugar sprinkles along with red M&Ms for a Christmas vibe. You can even swap the M&M for a mini candy cane for a peppermint flavor. The choices are endless!
Using Different Types of Cookies
Oreo cookies are great, but you can use other cookies too. Try chocolate wafer cookies for a deeper chocolate taste. Vanilla wafers offer a lighter flavor and can be fun with different toppings. You can even use gluten-free cookies if you need to. Just follow the same steps, and you’ll have a tasty treat!
Gluten-Free or Dairy-Free Options
For a gluten-free version, use gluten-free Oreo cookies. They taste just as good. If you want to make it dairy-free, choose dairy-free chocolate chips. You can find these at most grocery stores. Both swaps keep the fun while meeting dietary needs. Enjoy the treats without worry!
Storage Information
How to Store Oreo Reindeer Pops
To keep your Oreo reindeer pops fresh, store them in an airtight container. Place a piece of parchment paper between the layers to avoid sticking. Keep the container in a cool, dry spot away from sunlight. If you have a lot, you can stack them carefully.
Freezing Tips for Longer Preservation
You can freeze Oreo reindeer pops for longer storage. Wrap each pop in plastic wrap tightly. Then, place them in a freezer bag. They can stay fresh for up to two months. When you want to eat them, move them to the fridge overnight. This helps them thaw slowly without losing texture.
Shelf Life of Prepared Treats
When stored properly, Oreo reindeer pops last about a week at room temperature. If you keep them in the fridge, they can last up to two weeks. Always check for any changes in smell or taste before serving. Enjoy these sweet treats while they are still fresh!
FAQs
Can I use other types of chocolate besides semi-sweet?
Yes, you can! Milk chocolate or dark chocolate also works well. Each type gives a unique taste. White chocolate is another fun option. Just remember, white chocolate may need more care when melting.
What if my chocolate doesn’t melt smoothly?
If your chocolate is lumpy, try these tips. First, ensure you use a microwave-safe bowl. Heat it in short bursts of 30 seconds. Stir well between each burst. If it still doesn’t melt well, you can add a teaspoon of vegetable oil. This helps it blend and smooth out.
How can I make these treats more festive for parties?
Make your reindeer pops shine! Add colorful sprinkles or use different candies. Use green and red candy melts for more color. You can also use edible glitter to make them sparkle. Present them in a fun way, like in a festive jar or with ribbons.
Are there any other uses for leftover Oreo filling?
Absolutely! You can make Oreo truffles. Just mix the filling with cream cheese, roll into balls, and dip in chocolate. You can also stir it into frosting for cakes or cupcakes. Another idea is to add it to smoothies for a sweet twist.
Oreo Reindeer Pops are fun and easy to make. You learned the ingredients needed and how to customize them. I shared step-by-step instructions for preparing, melting, and assembling. You now have tips for decorating and storing your treats. Remember, you can change toppings and use different cookies, too. These treats are perfect for any gathering. Enjoy making these festive snacks and impress your friends and famil