Are you craving a sweet and tangy treat that’s easy to make? Look no further! My Key Lime Pie Bars are simple, fun, and oh-so-refreshing. With a zesty filling and a crunchy crust, these bars are perfect for any occasion. In this post, I’ll guide you step-by-step through the ingredients, tips, and tricks that will help you create the ultimate dessert. Let’s get started on this citrus delight!
Why I Love This Recipe
- Bright and Tangy Flavor: The refreshing zest of key limes brings a vibrant taste that perfectly balances sweetness and tartness.
- Easy to Make: This recipe is straightforward, requiring minimal ingredients and just a few simple steps for delicious results.
- Perfect for Any Occasion: Whether it’s a summer BBQ or a holiday gathering, these bars are a hit and add a tropical touch to any dessert table.
- Chilled Delight: Served cold, these bars offer a refreshing treat that’s especially appreciated on warm days.
Ingredients
List of Ingredients
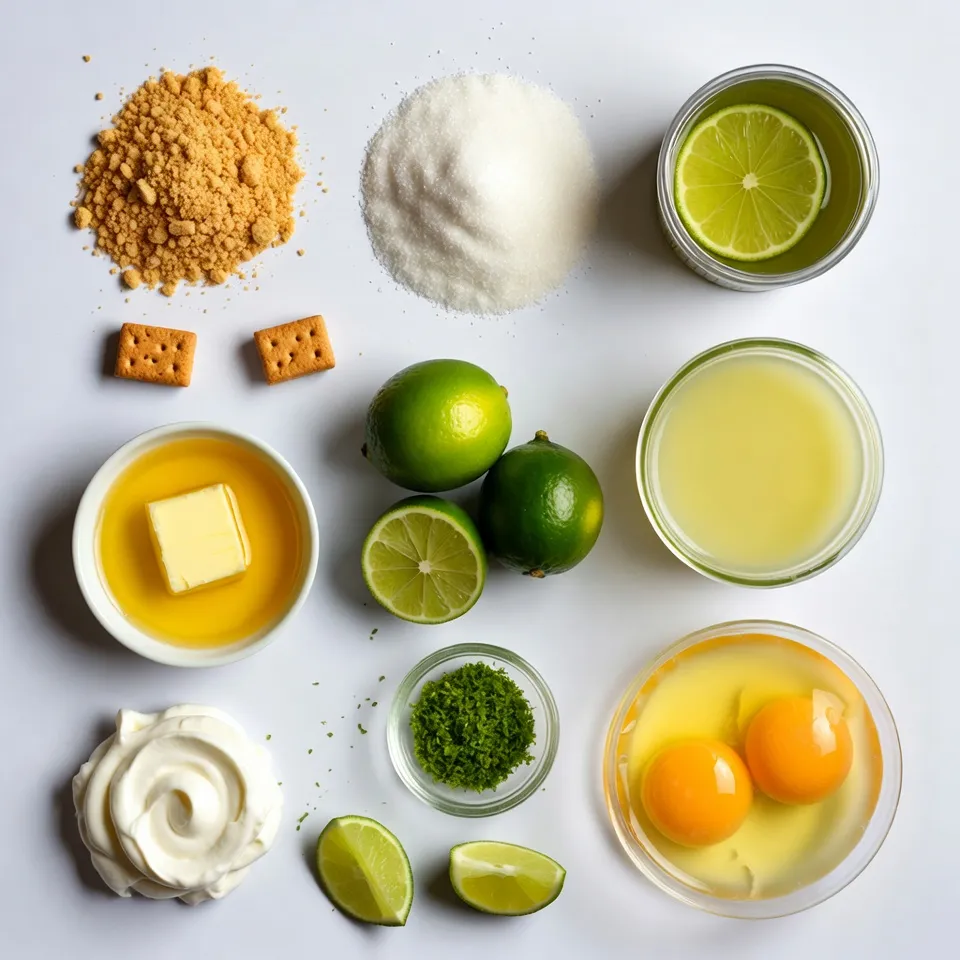
To make the key lime pie bars, you need the following ingredients:
– 1 ½ cups graham cracker crumbs
– ⅓ cup granulated sugar
– ½ cup unsalted butter, melted
– 1 (14-ounce) can sweetened condensed milk
– ½ cup fresh key lime juice (about 4-6 key limes)
– 2 large egg yolks
– 1 teaspoon lime zest
– Whipped cream for topping (optional)
– Lime slices for garnish (optional)
Tips for Selecting Fresh Key Limes
Choosing the right key limes is key. Look for limes that feel heavy for their size. They should be smooth and firm. A bright green color shows they are fresh. Avoid limes with blemishes or soft spots. Fresh key limes have a sweet and tart smell. You can check this by giving them a sniff.
Substitutions for Key Lime Ingredients
If you cannot find key limes, you can use regular limes. They will work well but may taste a bit different. You can also use bottled key lime juice, but fresh is best for flavor. For a gluten-free crust, swap graham crackers with gluten-free cookies. To make it dairy-free, use coconut cream instead of sweetened condensed milk.
Step-by-Step Instructions
Prepping the Crust
First, I preheat my oven to 350°F (175°C). I line an 8×8 inch baking pan with parchment paper. I leave some paper hanging over the sides. This makes it easy to lift out the bars later. In a medium bowl, I mix 1 ½ cups of graham cracker crumbs, ⅓ cup of granulated sugar, and ½ cup of melted unsalted butter. I stir until the crumbs look like wet sand. Then, I press this mixture into the bottom of the pan. I use the back of a measuring cup to pack it tightly. Next, I bake the crust for about 10 minutes until it turns lightly golden. After that, I take it out and let it cool a bit.
Making the Key Lime Filling
In another mixing bowl, I whisk together a 14-ounce can of sweetened condensed milk, ½ cup of fresh key lime juice, 2 large egg yolks, and 1 teaspoon of lime zest. I mix until everything is smooth and well combined. This mixture smells bright and refreshing. Once the crust has cooled slightly, I pour the key lime filling over it. I spread it evenly to cover the crust completely.
Baking and Cooling Process
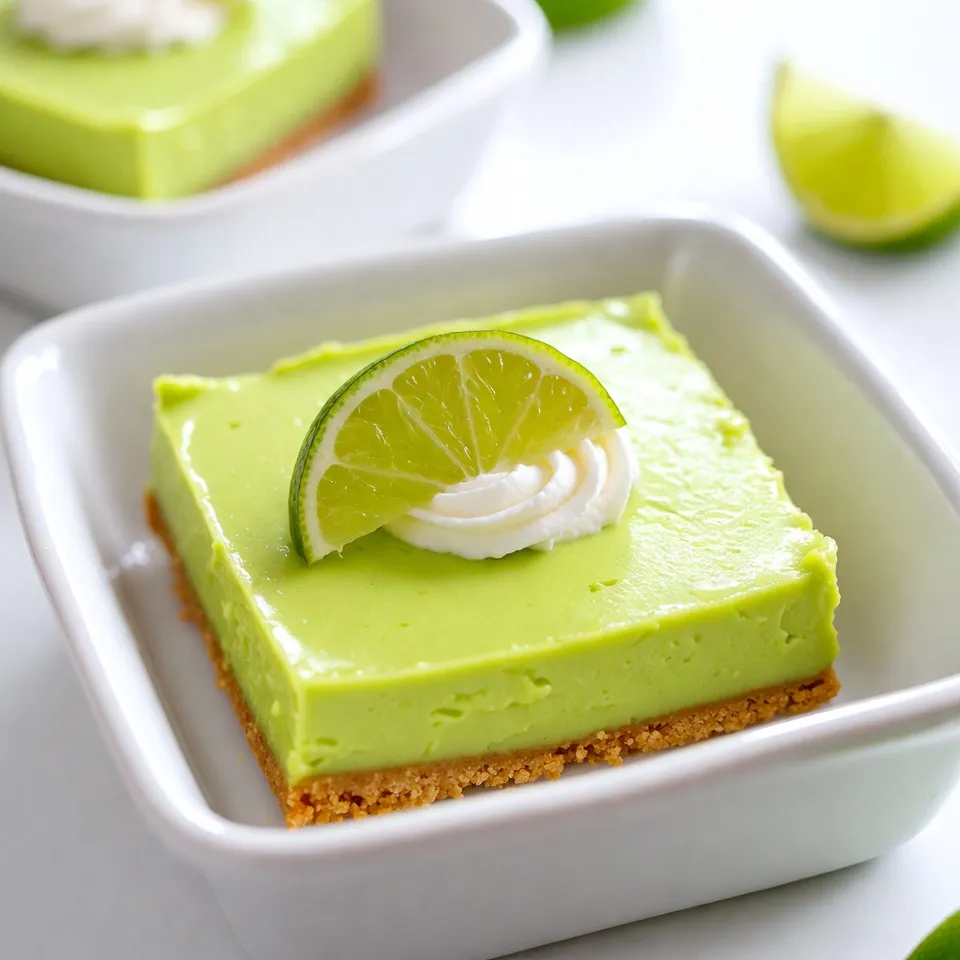
I return the pan to the oven and bake the bars for another 15 minutes. Once done, I take them out and let them cool at room temperature for about 30 minutes. Then, I place the pan in the fridge for at least 2 hours. This helps the bars set up nicely. Once they are set, I lift them out using the parchment paper. I cut them into squares or bars. If I want, I can top each bar with whipped cream and add a slice of lime for garnish.
Tips & Tricks
Perfecting the Crust Texture
To get a great crust, use fresh graham cracker crumbs. I like to crush whole crackers in a zip-top bag. Combine them with sugar and melted butter. Mix until it looks like wet sand. Press this mixture firmly into the bottom of your pan. A tight crust helps keep your bars from crumbling. Bake it for about 10 minutes until golden. This gives it a nice crunch.
Ensuring the Filling Sets Properly
For the filling, mix sweetened condensed milk, key lime juice, egg yolks, and lime zest. Whisk until smooth. Make sure to pour the filling over a cooled crust. This helps the filling set well. Bake it for 15 minutes. After baking, let the bars cool for 30 minutes. Then, chill them in the fridge for at least 2 hours. This cooling time helps the bars firm up nicely.
How to Achieve the Best Flavor
Use fresh key limes for the best taste. If you can’t find key limes, Persian limes work too. Just know they will change the flavor a bit. Always add lime zest to your filling for extra zing. You can also top the bars with a bit of whipped cream. Garnish with lime slices to add color and freshness. This will make your dessert even more appealing.
Pro Tips
- Use Fresh Key Limes: For the best flavor, use fresh key limes instead of bottled juice. The taste will be noticeably brighter and more vibrant.
- Chill for Best Texture: Allow the bars to chill for at least 2 hours in the refrigerator after baking. This helps them set properly and enhances their texture.
- Perfect Your Crust: Make sure to pack the crust firmly into the pan. This will help it hold together when cutting into bars and prevent crumbling.
- Garnish for Presentation: A dollop of whipped cream and a slice of lime not only add flavor but also elevate the presentation of your key lime pie bars.
Variations
Different Crust Options
You can switch up the crust in many ways. Try using crushed cookies like Oreos instead of graham crackers. This gives a fun twist and adds more flavor. You can also use almond flour for a gluten-free crust. Just mix it with melted butter and sugar, then bake as usual. Each option adds a unique taste and texture to your Key Lime Pie Bars.
Flavor Enhancements
To make these bars even more exciting, add fun flavors. Try mixing in shredded coconut for a tropical touch. You can also add fresh berries like raspberries or blueberries. Just fold them into the filling before baking. These flavors brighten the bars and make them more colorful. Each bite will be a burst of zesty goodness.
Topping Alternatives for Serving
While whipped cream is a classic topping, you can explore other options too. Consider using a dollop of coconut cream for a richer flavor. You can also sprinkle toasted coconut on top for crunch. If you love fruit, add fresh berries or lime slices as a garnish. These toppings not only look pretty but also add extra taste.
Storage Info
Best Practices for Storing Key Lime Pie Bars
To keep your Key Lime Pie Bars fresh, store them in an airtight container. This helps prevent them from drying out. Always place the bars in the fridge if you do not eat them right away. Use parchment paper to separate layers if you stack them. This way, they stay nice and neat.
How Long Do They Last in the Fridge?
These bars stay good in the fridge for about five days. After that, they may lose some flavor and texture. If you notice any signs of spoilage, it’s best to toss them. Always check for a sour smell or change in color before enjoying.
Can They Be Frozen?
Yes, you can freeze Key Lime Pie Bars! Wrap them tightly in plastic wrap and then foil. This keeps out air and prevents freezer burn. They can last up to three months in the freezer. When you want to eat them, thaw them in the fridge overnight. Enjoy them cold for a refreshing dessert!
FAQs
What is the difference between Key lime pie and Key lime pie bars?
Key lime pie is a whole pie, while Key lime pie bars are cut into squares. Bars have a crust, filling, and are easier to serve. The flavors are similar, but the bar form makes them great for gatherings. Plus, they are more portable and fun to eat.
Can I use regular limes instead of Key limes?
Yes, you can use regular limes. However, Key limes have a unique taste. They are sweeter and more tart than regular limes. If you choose regular limes, your bars will taste a bit different. You may want to adjust the sugar to balance the flavor.
How do I make these bars gluten-free?
To make Key lime pie bars gluten-free, use gluten-free graham cracker crumbs. Many brands offer these. You can also make your own crumbs from gluten-free cookies. Just ensure all other ingredients are gluten-free, too.
What should I serve with Key Lime Pie Bars?
Key lime pie bars pair well with whipped cream. You can also add fresh fruit like berries. A scoop of vanilla ice cream complements the tartness, too. For a twist, serve with a slice of lime on top or a sprinkle of zest.
You now have all you need to make delicious Key Lime Pie Bars. We covered the best ingredients, tips for fresh limes, and smart substitutes. I shared step-by-step instructions, so you can prep the crust and filling with ease.
Don’t forget the tips and tricks for a perfect texture and flavor. Explore variations to personalize your bars, and learn how to store them properly. Enjoy your baking journe